
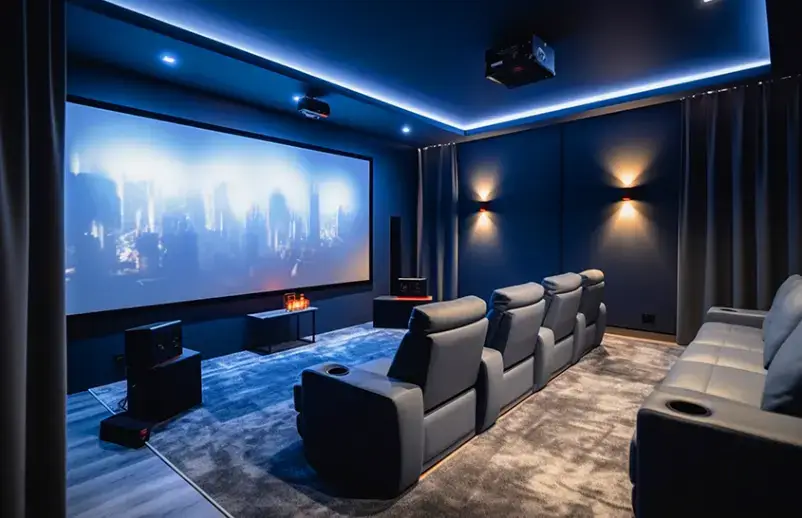
Home Theater design in Long Island is highly unique due to the region’s sprawling estates and historic architecture. Designing a home theater requires focusing on tailored room layouts, premium acoustics, and high-end video integration. An ideal room combines the right screen size, quality surround sound, comfortable seating, good acoustics, and controlled lighting. Enjoy elevated entertainment and clutter-free aesthetics with professional home theater installation Long Island.
Creating Your Private Gold Coast Cinema
Searching for custom home theater systems Long Island? Movies, TV shows, or sports events- enhance your viewing experience with luxury home theater designs. Integrated smart systems increase property value across Nassau and Suffolk Counties. Simple residential audio-video installation on Long Island takes 2 to 4 hours, while a whole home audio system, hidden wiring or a custom home theater may take 3 to 5 days, depending on room preparation and system complexity.
Location
Basements are gold standards for home theaters across Nassau and Suffolk counties. If you have an open concept floor plan, designate a distinct walled-off zone. Keep your theater away from noisy areas and machinery like HVAC handlers or plumbing lines to maintain a cinematic feel.
Any unused room can be used, but avoid rooms with large, street facing windows or use motorized blackout shades to achieve a pitch-black cinematic experience.
Room Dimensions
Rectangular basement spaces with dimensions around 12ft x 18ft x 9ft can manage acoustics and allow for multi-tiered seating. For optimal acoustics and immersion, aim for 15 ft x 20 ft with 9 ft ceilings to accommodate Dolby Atmos setups.
Make sure to install moisture barriers in basements along with sound-dampening insulation and a mechanical exhaust system before installing acoustic fabrics.
Entrance and Exit
The entryway establishes a deliberate transition from everyday life into a private escape. The door should be at the rear or side rear of the space. This ensures the hallway light does not wash out the projection. A heavy sound-dampened door paired with rubber sweeps eliminates air gaps.
For a well-planned exit, your smart home system 9like Creston or Control 4) should trigger motion sensor footlights as the credits roll. For unified control, install a master keypad just outside the exit to shut down the whole system and bring back the house lights in one touch.
A small hallway just outside with a popcorn machine, wet bar or media rack serves as a buffer to soundproof the theater.
Screen Size
- Multiply your seating distance in inches by 0.835 to find your ideal cinematic screen width. For medium to large basements, 120 to 135 inch acoustically transparent screens are the sweet spot.
- If you are designing a colonial or ranch layout, opt for large format 85 to 98 inch 4K LED TVs. Or pair an Ultra Short Throw (UST) projector with an ALR (Ambient light rejecting) screen.
- Your main viewing angle should rest between 30 and 40 degrees. For a 4K resolution screen, your seating distance in feet should be 1 to 1.5 times the width of your screen in feet.
- A 16:9 inch screen is best for gaming and TV, while Cinemascope (2:35:1) is the standard for watching widescreen movies without black bars.
- The screen should be placed 30 to 36 inches off the floor with the middle of the screen at the eye level for the front row.
Screen Viewing Angles
- Your main viewing angle should rest between 30 and 40 degrees. For a 4K resolution screen, your seating distance in feet should be 1 to 1.5 times the width of your screen in feet.
- CEDIA (Custom Electronic Design and Installation Association) often recommends a 45-degree angle for 2:39:1 Cinemascope content for a truly ultimate theater feel.
- The Society of Motion Pictures and Television Engineers suggests a 30 degree horizontal viewing angle, which is more comfortable for mixed viewing like sports, TV and gaming.
Acoustics and Soundproofing
Decoupling is the absolute best method for soundproofing. Build staggered wood stud walls or use metal resistant channels (like RSIC-1 clips) so the drywall never touches the studs. Install two layers of ⅝ inch drywall with viscoelastic dampening compound between them.
Install thick foam or dense fiberglass bass traps in all four vertical corners to prevent muddy, overpowering sound. Place acoustic absorbent panels at the ‘first reflection points’ on your side walls, ceiling and rear walls. Place diffusion panels on the back and upper side walls to keep the room feeling alive, creating an immersive surround sound stage.
Smart Integration
Connect your lighting, temperature and media in one ecosystem. Use platforms like Control4, Creston or Lutron to program scenes via a single touchscreen or voice assistant. Work with local certified experts to ensure your home theater complies with Nassau and Suffolk County building codes and electrical standards.
AV/Video Sources and Controller
Pair high-end AV sources like Kaleidescape systems and 4K Blu-ray players with centralized automation systems like Creston or Control 4 for seamless one-touch control.
A truly cinematic experience requires 4K/8K projectors with ALR 9Ambient Light Rejecting) screens or large OLED video walls for perfect color and contrast from any angle.
Lighting and Ambiance
Neighborhoods like Manhasset, Jericho and Dix Hills feature spacious basements that are ideal for isolating your theater from natural light. A proper ambiance is built by layering task, accent and safety lighting. Subtle hi-hats are perfect initially but must be turned off later.
Use hidden LED strip lighting under seating tiers, behind the projection screen or along ceiling coves to create a soft glowing atmosphere that doesn’t wash out the image. Install step lights to prevent tripping in the dark. Mimic the night sky with customized fiber optic LED ceiling panels for “under the star” aesthetics.
Gold Coast and Art Deco Aesthetics
Inspired by Long Island’s historic Gold Coast, many local luxury theaters are highly stylized. Custom home theater systems Long Island can integrate vintage Hollywood elements like faux columns, plush red or gold drapery and fiber optic star light ceilings.
Tiered Seating
Careful planning maximizes your viewing angles and acoustics, especially in finished basements. You will typically need a 12 to 16 inch riser for the second row, ensuring clear sightlines and at least 6 to 8 feet of depth per row for reclining seats.
Many homes, especially older Colonials or Capes in Nassau, feature low basement ceilings. If your ceiling is under 8 feet, dropping to a 10-inch riser may be necessary to avoid cramped head clearance.
Theater recliners like Valencia Tuscany are the gold standard. Use sectionals and sofas if your theater doubles as a multipurpose family room. Opt for straight rows if your room is narrower than 18 feet. Curved arrangements offer better viewing angles for far left and far right seats but require more room depth.
| Without a riser platform usually 8-12 inches tall, the second row’s view will be completely blocked, making elevation and tiered seating necessary. |
Ceilings
Ceilings require strategic acoustic treatments to balance sound for Dolby Atmos immersion, specific ceiling heights (9- 12 ft), and strict low-reflectance finishes. Nassau and Suffolk basements are prone to echo and slap echo caused by parallel floor and ceiling surfaces.
- Install acoustic cloud panels (typically 2×4 ft fiberglass or mineral wool cores) above the primary seating area to absorb sound reflections.
- Use diffusion panels in the rear two-thirds of the ceiling to scatter sound waves.
- Mount height speakers in the joist cavity to preserve clearance in the room with a standard 8 ft ceiling.
Floors
Avoid bare concrete, which can be your theater’s worst enemy. Install a raised wood subfloor. Choose heavy, dense, low-pile carpets to prevent the echoey sounds. Never skimp on padding, which forms an integral part of acoustic treatment.
How to Further Elevate the Experience?
Elevate your media room experience by adding additional features such as
- Theater-style popcorn maker.
- A built-in kegerator.
- Mini fridge for canned drinks.
- Illuminated shelving for candies, pretzels, and nachos.
- Integrate a high-end racing simulator rig.
How Much does a Media Room Cost in Long Island?
Home theater costs on Long Island average around $12,000 to $60,000. High-end custom setups can exceed $100,000 depending on room size.
- Basic Setup: $3000 to $ 8500+, including basic TV mounting, sound bar, and simple wire management.
- Mid Range Systems: $12,000 to $22,000, including basic projector, 5.1/7.1 surround sound and calibration.
- Premium Media Rooms: $25,000 to $36,000 including a 4K projector, projection screen, Dolby Atmos audio dome and basic acoustic panels.
- Luxury Dedicated Theater: $40,000 to $100,000+, including room framing, soundproofing, custom tiered seating, smart automation, and reference-grade equipment.
Common Mistakes to Avoid
- Ignoring Long Island architecture. Many homes, especially in areas like the Hamptons or older Nassau County, feature surfaces like exposed brick or large glass windows that create echo chambers.
- Skipping bass traps. Placing seating along a wall results in boomy, muddy bass.
- No acoustic treatment. Bare walls cause sound reflections, making dialogue unclear. Balance the room with bass traps and sound-absorbing panels.
- Oversized screens. Squeezing a massive screen into a cramped space leads to eye and neck strain.
- Mounting TV too high: Placing screens above eye level can cause uncomfortable neck craning.
- Flat seating rows: If all seats are on the same level, the back row’s view would be blocked.
- Ambient lighting interference: Avoid placing screens opposite large windows or basement egress doors, as this washes out the picture.
- Highly reflective paints: Glossy or light colored walls bounce light back on the screen, ruining the contrast.
- Ignoring dimmers: Standard room lights kill the cinematic experience. Install motorized blackout shades and dimmable smart lighting.
- Inadequate wiring and conduits: Power lines too close to audio cables result in buzzes. Forgetting to run conduits for future upgrades can result in construction headaches.
- Poor equipment ventilation: Shoving AV receivers and amplifiers into closed, unventilated cabinets limits equipment lifespan and risks overheating.
- Improper subwoofer placement: Dropping a subwoofer into a corner will create dead zones or overpowering bass nodes. Use the subwoofer crawl method to find the optimal spot in your room.
- Skipping equipment calibration: Leaving the AV receiver and the TV on their default settings will mute dialogues, distort colors, and ruin immersion, creating a poor cinematic experience.
Conclusion
From sprawling Gold Coast estates to modern condos and finished basements, a custom home theater requires a blend of high-end audio-visual engineering and seamless smart home integration. Local experts recommend beginning with custom room dimensions, adding tiered seating, professional acoustical treatments, layered lighting controls and 4K/8K projection for an enhanced viewing experience.
Audio Video Long Island specializes in designing and installing high-quality custom solutions that fit effortlessly into your lifestyle. Contact us for rich, immersive surround sound acoustics.
FAQs
How to design a home theater?
Before designing a home theater, consider the following points such as room dimensions, soundproofing, controlled lighting, proper screen size, balanced speaker placement, and comfortable seating.
What’s the golden ratio for home theater?
The golden ratio utilizes the acoustic proportion 1:1.618: 2.618 (height, width, length) to evenly distribute bass frequencies and minimize standing waves. If your ceiling height is 10 feet, the width would be 16.18 ft and the room would be 26 ft long for balanced sound.
What are some common home theater mistakes to avoid?
Common home theater mistakes include choosing the wrong screen size, poor lighting control, suboptimal layout, choosing the wrong seats, neglecting acoustics, and skipping system calibration.
Does a media room require special wiring?
Yes, media rooms require specialized wiring to support heavy power load, deliver reliable high-speed internet, and neatly route audio-visual (A/V) cables without visual clutter.
Can I build a home theater in a small room?
Yes, you can easily build a home theater in a small room. Focus on small space utilization and skip crowded speaker layout. Ensure the wall-mounted screen fits your line of sight.